Algunos de nuestros usuarios han informado que MuMu Player se atascó en 99% mientras arranca. Primero, por favor deshabilite el firewall de Windows, quit the antivirus on your pc and try again. If the problem remains, you can see the two different situations and each one could try the solutions below.
Situation One: Nox stucks at 0-99% in startup and receive no error message
Solution One: some AMD CPU may encounter this due to the affect of amd-v. Please enalbe VT (Virtulization Technology) of your computer following this post: Enalbe VT to get better performance
Solution Two: Another possible cause is Graphics Card or it’s driver does not support to run MuMu Player. Please download and run this little tool we have developed: OpenGLChecker. If your OpenGL version < 2.0 you need to change your graphics card. If your OpenGL version ≥ 2.0 but still stuck at 99%, then you need to update your Graphics Card driver.
Solution Three: If you set your file system to FAT32 it may cause this problem because FAT32 has a limit to the maximum size of each single file. In this case, please change your file system to NTFS or reinstall MuMu Player to a NTFS disc.
Situation Two: MuMu Player stucks at 99% in startup and then receive this error message: System has problems to start, please try to repair!
Note that this only applies to case of stucking at 99% due to system reasons. Do not change any thing in this tool provided unless you know what you are doing.
1. Run MuMu Player as administrator (right-click xeplayer.exe or the MuMu Player icon on your desktop and choose “Run as administrator”)
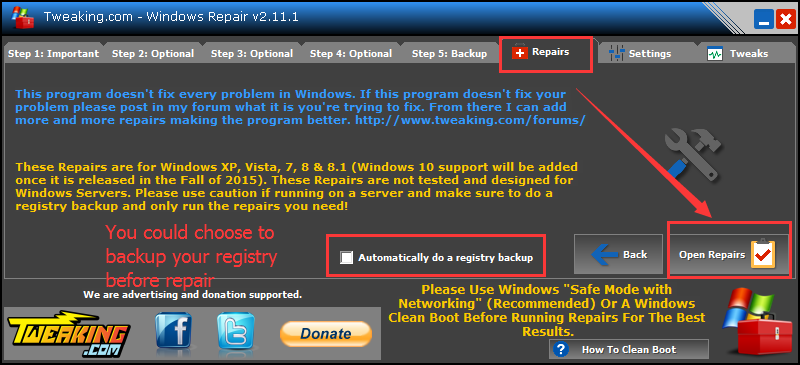
2. Download this software called “Windows Repair“, unzip it to your computer.
3. Double click to start the “Windows repair” software, go to “Repairs” tab – open repairs (note: you could choose to back up your registry first if you worry any problem this might cause)

4. In the next window appeared, click “start repairs”. The default setting is to restart your computer after repair. If you don’t want to, please un tick the box as shown below before you start.


